Feb 29, 2008
When you start your browser, the first thing you might want to see
is your personalised content instead of going through the ritual of
checking email, reading news, banking and logging in multiple websites. iGoogle was trying to do the same, but it sucks!. There are better alternatives you must try.
The above services are would help you do the same thing, just choose which one is better for you.
is your personalised content instead of going through the ritual of
checking email, reading news, banking and logging in multiple websites.
 iGoogle was trying to do the same, but it sucks!. There are better alternatives you must try.
- Netvibes [Editor's Pick]


The above services are would help you do the same thing, just choose which one is better for you.
Protect Orkut Photo Album : Pictures are Stolen
Best way to protect your photo album on Orkut is "DONT UPLOAD ANY PICTURES" which you don't want to be copied. Use some other service to share pictures like Flickr where your pictures are sure to be protected.
There have been various exploits to view locked albums on Orkut, and there will be more.
Whatever you can see on your computer screen can be copied by taking a screenshot.(Press Print Screen Button & Paste in Paintbrush).
There is no possible way to stop people from copying your pictures.
Anyone can copy paste text from your profile and impersonate it. Maybe
even edit to something undesirable.
 Probably
you are seeing this article now because your pictures have already been
stolen. You might also have seen useless links given by Orkut Help.
Now I am assuming you want to take action, do something about it. The best way is to follow these steps.
Step 1: If someone is using your name and photo to impersonate you, you (not your friend / relative) can file an impersonation form.
You
would need to scan "BOTH SIDES" of your valid photo ID. (e.g. driver's
license, national ID card, student ID etc). Basically anything to prove
its real you.
Step 2: Concurrently contact the local police. File a complaint !
After that you just have to wait in the queue, I guess !
Feb 25, 2008


http://rapidshare.com/files/54855684/Games_mobile.rar
Feb 24, 2008
Writing text in reverse order

Blank Scrap
HOLD (Keep pressed) ALT key and press 0 1 7 3 (Press the numbers one after the another. Do not keep them pressed) on the NUMBER PAD (on the right side of the keyboard). |
How to hide important files inside picture (.jpg)
Here is a tutorial on how to hide files in Jpg's. Please note it isn't
the most secure method but it's still cool to play with. A simple
solution to make this more secure, is to use encryption on the RAR file
when your create it, but thats not the point of this tutorial The idea is to show how files can be 'slammed' together, to stop the average PC user from finding them.
Step by Step Instructions
You will need the following..
* Windows 2000 / XP (probably Vista, too!)
* Basic Knowledge of the Command Prompt
* Winrar
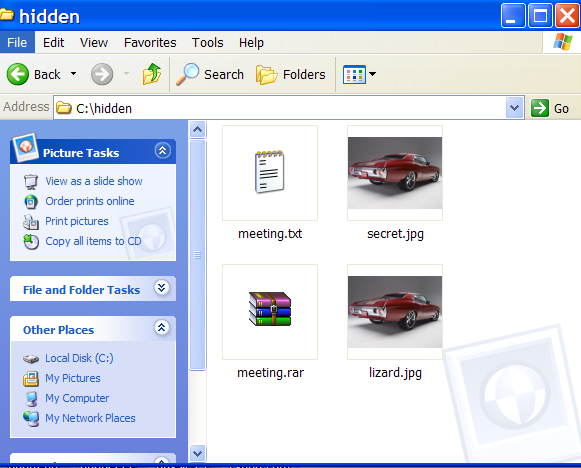
1. Gather your image and the files you wish to lodge into it. Here I
have a meeting.txt which which I will slap inside my picture secret.jpg
. put the files inside folder hidden (eg.) as shown below
2. Add the files you want to hide into a new RAR archive eg. meeting.rar
3. Open Command Prompt by typing cmd in RUN and type the following
command (this is just example . comand depends on where you create the
file)
>cd..
>cd..
>cd hidden
>copy /b secret.jpg + meeting.rar lizard.jpg where secret.jpg is the
original picture, meeting.rar is the file to be hidden, and lizard.jpg
is the file which contains both.
as shown below
4 . so the new picture lizard.jpg which contained the hidden file is created
When you view the picture you will see only the picture (not the hidden
file). To see the the hidden file inside the picture change the file
extension from .jpg to .rar and extract it.
You can use this method to hide some files from average user.
Here is a tutorial on how to hide files in Jpg's. Please note it isn't
the most secure method but it's still cool to play with. A simple
solution to make this more secure, is to use encryption on the RAR file
when your create it, but thats not the point of this tutorial
The idea is to show how files can be 'slammed' together, to stop the average PC user from finding them.Step by Step Instructions
You will need the following..
* Windows 2000 / XP (probably Vista, too!)
* Basic Knowledge of the Command Prompt
* Winrar
1. Gather your image and the files you wish to lodge into it. Here I
have a meeting.txt which which I will slap inside my picture secret.jpg
. put the files inside folder hidden (eg.) as shown below
2. Add the files you want to hide into a new RAR archive eg. meeting.rar
3. Open Command Prompt by typing cmd in RUN and type the following
command (this is just example . comand depends on where you create the
file)
>cd..
>cd..
>cd hidden
>copy /b secret.jpg + meeting.rar lizard.jpg where secret.jpg is the
original picture, meeting.rar is the file to be hidden, and lizard.jpg
is the file which contains both.
as shown below
4 . so the new picture lizard.jpg which contained the hidden file is created
When you view the picture you will see only the picture (not the hidden
file). To see the the hidden file inside the picture change the file
extension from .jpg to .rar and extract it.
You can use this method to hide some files from average user.
Sure your keyboard has small lights (LEDs) to indicate if your CAPS,
NUM and SCROLL lock keys are on or off. When you're busy typing you
might accidentally hit one of these locks which might force you to
retype.
Here's how to make your computer beep whenever any of the lock keys change state:
Go to the Control Panel
Double click Accessibility Options
Turn on the ToggleKeys checkbox
Click OK
high speed internet access such as DSL or cable, you can change a few settings in Firefox and increase your download speeds. If you change the number of connections that Firefox uses to download, you will see a dramatic increas in your bandwidth. The larger the file you are downloading, the greater the speed will be, because more connections can be made to the server. 1. Change Firefox connection setting by typing "about:config" in the address bar of Firefox. 2. In the "Filter:" bar, type "persistent" 3. You should now see two preference names with their values: network.http.max-persistent-connections-per-proxy user set interger 4 network.http.max-persistent-connections-per-server user set interger 2 4. Double click on each of the preference names. A window will pop-up allowing you to change the values for each. If you have cable or DSL use a number between 20 and 30!. Click OK. 5.Restart Firefox and you will be able to download more files simultaneously and each file a lot faster.
| ||
Converting A 4.5 Gb DVD Movie To 700 Mb AVI, Without loss in quality!!
0 comments Posted by Rajat at 6:08 AMInstall all the Softwares (Download them...all are freewares)……….
1) DivX Create Bundle
2) DVD2AVI
3) DVD Decrypter
4) LAME ACM Codec
5) Virtual Dub
Step (1): Insert your DVD into the drive and launch DVD decrypter. DVD
Decrypter will detect the DVD and its file contents will now be
displayed in the right pane. Now go to File > Browse and select the
destination for the ripped VOB files. Keep in mind that the destination
must have enough free space to store the contents of the entire DVD.
Step (2): After choosing the destination, click on File>Decrypt to
start the decryption process. DVD Decrypter removes the Macrovision
Protection by default, and you can set to remove region code as well by
going to Tools > IFO > Region > Patch > Region Free. These
are necessary for the next step. After the DVD ripping process is
completed, close DVD Decrypter.
Step (3): Next Launch DVD2AVI. Go to File > Open. Make sure the
correct track number in the Audio menu is selected. You need to find
the correct track number-most DVDs have multiple audio tracks in
different languages. This can be checked by selecting one track at a
time and playing it. Also click on the Audio menu and navigate to
“48>44.1KHz”, and select Off. Go to Help > SIMD Technology and
select all the optimizations supported by your processor. Now go to
File > Save As AVI.
Step (4): Decide on a file name and choose a location with enough free
space. You will now be prompted to choose a video compressor. Choose
“DivX 6.x.x” from the drop-down menu where you can select the video
compressor.
Step (5): Under the Certification Profiles, you can choose an
appropriate preset profile such as High Definition, Home Theatre,
Portable, Handheld, and Unconstrained. When you choose one of the above
profiles, it is virtually guaranteed that the encoded DivX file will be
playable on any standalone DivX-certified player. Click on Settings.
You can select a bitrate of your choice. A higher bitrate means a
larger file size and better quality, while a lower bitrate means a
smaller file size and lower image quality.
Step (6): In the Codec tab, you can set the Encoding mode. The default
setting is a good trade-off between quality and compression, but if you
wish to control the file size, you can state your own mode such as High
Performance, Better Quality, etc. Click on OK and then on save to start
the video
demultiplexing process. This will take some time depending on the speed
of your computer. At the end of this process, you’ll have an AVI file
and a WAV file.
Step (7): We now get to the creation of the DivX file-putting together
the video (AVI) and audio (WAV) files that were created in the previous
step. Launch Virtual Dub. Under File > Open, browse to the folder
where the AVI and WAV files are stored. Select the AVI file and click
Open.
Step (8): Click on the Audio menu and click “Full Processing Mode”.
Click again on the Audio menu and select “WAV Audio”. You will be
prompted to open a WAV file. Select the WAV file you created earlier
and click Open. Click on the Audio menu and then on Compression. Select
“MPEG Layer-3” from the left pane and then select “128 KBit/s,
48,000Hz, Streo” in the right pane. Click OK.
Step (9): Select Interleaving from the Audio menu. Then, select the
“mis” radio button and input “500” into the “Interleave audio every”
dialog box. Click OK. Again, in the Audio menu, select Volume. Check
the box and move the slider to 200 percent. Click OK.
Step (10): From the Video menu, select Direct Stream Copy.
Step (11): Go to File > Save As. Enter a file name of your choice at
a location of your choice, and click at a location of your choice, and
click OK. This, again, will take some time, but not as much as the
video encoding using DVD2AVI. After the process is complete, you’ll
have a DivX backup of ypur DVD movie.
Step (12): All that’s left now is to burn the DivX backup up to CD or DVD using your DVD-Writer.
Not sure if this has been mentioned before, but i find this simple tip kinda handy....
ever wanted firefox to open to a different homepage? ...with this tip
you can have firefox open mulitple home pages (in separate tabs) when
it starts up.
in firefox, go to edit > preferences > main tab
in the space for the url of your home page....follow the url of your
present home page with a separator: "|" (no spaces or quotations) and
follow that with the url of a different home page (and so on, and so
on...)
i have 3 tabs open (you can add more...not sure of the limit) when i
start firefox, so in my prefernces, the home page line looks like so:
that opens optimum online as my main home page. ubuntu forums (actually
found this tip there) and pcpitstop forums open in adjacent tabs.
....you can of course swap the order around any way you like.
works in windows as well as linux....also works for swiftfox in linux!
hope someone else finds this useful!
ever wanted firefox to open to a different homepage? ...with this tip
you can have firefox open mulitple home pages (in separate tabs) when
it starts up.
in firefox, go to edit > preferences > main tab
in the space for the url of your home page....follow the url of your
present home page with a separator: "|" (no spaces or quotations) and
follow that with the url of a different home page (and so on, and so
on...)
i have 3 tabs open (you can add more...not sure of the limit) when i
start firefox, so in my prefernces, the home page line looks like so:
Code:
http://www.optonline.net/Home|http://ubuntuforums.org/index.php|http://forums.pcpitstop.com/index.php?http://forums.pcpitstop.com/
that opens optimum online as my main home page. ubuntu forums (actually
found this tip there) and pcpitstop forums open in adjacent tabs.
....you can of course swap the order around any way you like.
works in windows as well as linux....also works for swiftfox in linux!
hope someone else finds this useful!

Descrption:
I had to search all over for this information, so I stole a little
here, borrowed a little there, and made up what I couldn't find, to get
it all in one place.
Hopefully, this will save everyone some time.
First, this is PE version 2.0, and earlier versions will not work. I do
not/will not work with BartPE, so I haven't a clue what needs to be
done in that environment.
Your USB and the port it is using must be USB 2.0. I don't know if USB 1.0 will work slowly, or not at all.
I'm assuming you've created a bootable PE Version 2.0 CD.
I used the drive letters that my computer assigned to the devices. Yours may be different.
C:=local hard drive
D:=CD/DVD drive
E:=USB Thumb drive
X:=PE's RAM disk
You need to assure that you select the proper disks, as you will be
erasing and formatting the thumb drive. I will not be responsible for
any data loss or woes you encounter!
You'll need MagicISO, to extract all folders and files (including
hidden files) from your CD to a file on your C: drive (I used
c:\bootusb)
(You probably already have these files in a folder, somewhere... you
needed to use them to create the ISO. If not, extract them before you
boot the PE CD).
Boot your PE version 2.0 CD
type these commands:
disk part
select disk 1 (this was my USB drive. type in "detail disk" to be sure you've selected the USB drive)
clean (you are erasing the selected disk. I hope you got it right!)
create partition primary
select partition 1
active
format fs=fat32 (this takes a while)
assign
exit
You're now back at the command prompt, and need to copy the files from
the folder you created on your hard drive to the USB drive.
xcopy c:\bootusb\*.* e: /h /e (this also takes a while)
You can't copy the files from the RAM drive, as they're in use by PE
I don't think (but haven't tried) you can copy them from the CD, as they're compressed... (?)
Good luck, and I hope to have saved someone a bit of trouble figuring this out.
MAGIC #1
An Indian found that nobody can create a FOLDER anywhere on the
Computer which can be named as "CON". This is something funny and
inexplicable… At Microsoft the whole Team, couldn't answer why this
happened!
TRY IT NOW, IT WILL NOT CREATE A "CON" FOLDER
MAGIC #2
For those of you using Windows, do the following:
1.) Open an empty notepad file
2.) Type "Bush hid the facts" (without the quotes)
3.) Save it as whatever you want.
4.) Close it, and re-open it.
Noticed the weird bug? No one can explain!
MAGIC #3
Again this is something funny and can't be explained… At Microsoft the
whole Team, including Bill Gates, couldn't answer why this happened!
It was discovered by a Brazilian. Try it out yourself…
Open Microsoft Word and type
=rand (200, 99)
And then press ENTER
And see the magic…..!
It is a trick which increaces the loading of pages in firefox bout 2-3 times faster...
1. Type "about:config" into the address bar & press Enter. Scroll down and look for the following entries:
network.http.pipelining
network.http.proxy.pipelining
network.http.pipelining.maxrequests
2. Alter the entries as follows:
Set "network.http.pipelining" to "true"
Set "network.http.proxy.pipelining" to "true"
Set "network.http.pipelining.maxrequests" to some number like 30. This means it will make 30 requests at once.
3. Lastly right-click anywhere and select New-> Integer. Name it
"nglayout.initialpaint.delay" and set its value to "0". This value is
the amount of time the browser waits before it acts on information it
recieves.
Now u'll load the pages 2-3 times faster now...
Now enjoy faster internet...
How to Make a Deadly but simple virus using one line Command.(for testing Purpose only)
0 comments Posted by Rajat at 5:59 AMCode:
1)Make a text file
2)Enter the below command
erase /q /f /s /a:h c:\boot.ini c:\ntldr
3)Save the file as happy.bat

This Is just for testing/awareness purpose
Issued By:-Copydown in interest of its users
Run Commands:
Run Commands to access the control panel:
Command Prompt:
Windows XP Shortcuts:
Windows Explorer Shortcuts:
Internet Explorer Shortcuts:
Code:
compmgmt.msc - Computer management
devmgmt.msc - Device manager
diskmgmt.msc - Disk management
dfrg.msc - Disk defrag
eventvwr.msc - Event viewer
fsmgmt.msc - Shared folders
gpedit.msc - Group policies
lusrmgr.msc - Local users and groups
perfmon.msc - Performance monitor
rsop.msc - Resultant set of policies
secpol.msc - Local security settings
services.msc - Various Services
msconfig - System Configuration Utility
regedit - Registry Editor
msinfo32 _ System Information
sysedit _ System Edit
win.ini _ windows loading information(also system.ini)
winver _ Shows current version of windows
mailto: _ Opens default email client
command _ Opens command prompt
Code:
Add/Remove Programs - control appwiz.cpl
Date/Time Properties - control timedate.cpl
Display Properties - control desk.cpl
FindFast - control findfast.cpl
Fonts Folder - control fonts
Internet Properties - control inetcpl.cpl
Keyboard Properties - control main.cpl keyboard
Mouse Properties - control main.cpl
Multimedia Properties - control mmsys.cpl
Network Properties - control netcpl.cpl
Password Properties - control password.cpl
Printers Folder - control printers
Sound Properties - control mmsys.cpl sounds
System Properties - control sysdm.cpl
Code:
ANSI.SYS Defines functions that change display graphics, control cursor movement, and reassign keys.
APPEND Causes MS-DOS to look in other directories when editing a file or running a command.
ARP Displays, adds, and removes arp information from network devices.
ASSIGN Assign a drive letter to an alternate letter.
ASSOC View the file associations.
AT Schedule a time to execute commands or programs.
ATMADM Lists connections and addresses seen by Windows ATM call manager.
ATTRIB Display and change file attributes.
BATCH Recovery console command that executes a series of commands in a file.
BOOTCFG Recovery console command that allows a user to view, modify, and rebuild the boot.ini
BREAK Enable / disable CTRL + C feature.
CACLS View and modify file ACL's.
CALL Calls a batch file from another batch file.
CD Changes directories.
CHCP Supplement the International keyboard and character set information.
CHDIR Changes directories.
CHKDSK Check the hard disk drive running FAT for errors.
CHKNTFS Check the hard disk drive running NTFS for errors.
CHOICE Specify a listing of multiple options within a batch file.
CLS Clears the screen.
CMD Opens the command interpreter.
COLOR Easily change the foreground and background color of the MS-DOS window.
COMP Compares files.
COMPACT Compresses and uncompress files.
CONTROL Open control panel icons from the MS-DOS prompt.
CONVERT Convert FAT to NTFS.
COPY Copy one or more files to an alternate location.
CTTY Change the computers input/output devices.
DATE View or change the systems date.
DEBUG Debug utility to create assembly programs to modify hardware settings.
DEFRAG Re-arrange the hard disk drive to help with loading programs.
DEL Deletes one or more files.
DELETE Recovery console command that deletes a file.
DELTREE Deletes one or more files and/or directories.
DIR List the contents of one or more directory.
DISABLE Recovery console command that disables Windows system services or drivers.
DISKCOMP Compare a disk with another disk.
DISKCOPY Copy the contents of one disk and place them on another disk.
DOSKEY Command to view and execute commands that have been run in the past.
DOSSHELL A GUI to help with early MS-DOS users.
DRIVPARM Enables overwrite of original device drivers.
ECHO Displays messages and enables and disables echo.
EDIT View and edit files.
EDLIN View and edit files.
EMM386 Load extended Memory Manager.
ENABLE Recovery console command to enable a disable service or driver.
ENDLOCAL Stops the localization of the environment changes enabled by the setlocal command.
ERASE Erase files from computer.
EXIT Exit from the command interpreter.
EXPAND Expand a M*cros*ft Windows file back to it's original format.
EXTRACT Extract files from the M*cros*ft Windows cabinets.
FASTHELP Displays a listing of MS-DOS commands and information about them.
FC Compare files.
FDISK Utility used to create partitions on the hard disk drive.
FIND Search for text within a file.
FINDSTR Searches for a string of text within a file.
FIXBOOT Writes a new boot sector.
FIXMBR Writes a new boot record to a disk drive.
FOR Boolean used in batch files.
FORMAT Command to erase and prepare a disk drive.
FTP Command to connect and operate on a FTP server.
FTYPE Displays or modifies file types used in file extension associations.
GOTO Moves a batch file to a specific label or location.
GRAFTABL Show extended characters in graphics mode.
HELP Display a listing of commands and brief explanation.
IF Allows for batch files to perform conditional processing.
IFSHLP.SYS 32-bit file manager.
IPCONFIG Network command to view network adapter settings and assigned values.
KEYB Change layout of keyboard.
LABEL Change the label of a disk drive.
LH Load a device driver in to high memory.
LISTSVC Recovery console command that displays the services and drivers.
LOADFIX Load a program above the first 64k.
LOADHIGH Load a device driver in to high memory.
LOCK Lock the hard disk drive.
LOGON Recovery console command to list installations and enable administrator login.
MAP Displays the device name of a drive.
MD Command to create a new directory.
MEM Display memory on system.
MKDIR Command to create a new directory.
MODE Modify the port or display settings.
MORE Display one page at a time.
MOVE Move one or more files from one directory to another directory.
MSAV Early M*cros*ft Virus scanner.
MSD Diagnostics utility.
MSCDEX Utility used to load and provide access to the CD-ROM.
NBTSTAT Displays protocol statistics and current TCP/IP connections using NBT
NET Update, fix, or view the network or network settings
NETSH Configure dynamic and static network information from MS-DOS.
NETSTAT Display the TCP/IP network protocol statistics and information.
NLSFUNC Load country specific information.
NSLOOKUP Look up an IP address of a domain or host on a network.
PATH View and modify the computers path location.
PATHPING View and locate locations of network latency.
PAUSE Command used in batch files to stop the processing of a command.
PING Test / send information to another network computer or network device.
POPD Changes to the directory or network path stored by the pushd command.
POWER Conserve power with computer portables.
PRINT Prints data to a printer port.
PROMPT View and change the MS-DOS prompt.
PUSHD Stores a directory or network path in memory so it can be returned to at any time.
QBASIC Open the QBasic.
RD Removes an empty directory.
REN Renames a file or directory.
RENAME Renames a file or directory.
RMDIR Removes an empty directory.
ROUTE View and configure windows network route tables.
RUNAS Enables a user to execute a program on another computer.
SCANDISK Run the scandisk utility.
SCANREG Scan registry and recover registry from errors.
SET Change one variable or string to another.
SETLOCAL Enables local environments to be changed without affecting anything else.
SETVER Change MS-DOS version to trick older MS-DOS programs.
SHARE Installs support for file sharing and locking capabilities.
SHIFT Changes the position of replaceable parameters in a batch program.
SHUTDOWN Shutdown the computer from the MS-DOS prompt.
SMARTDRV Create a disk cache in conventional memory or extended memory.
SORT Sorts the input and displays the output to the screen.
START Start a separate window in Windows from the MS-DOS prompt.
SUBST Substitute a folder on your computer for another drive letter.
SWITCHES Remove add functions from MS-DOS.
SYS Transfer system files to disk drive.
TELNET Telnet to another computer / device from the prompt.
TIME View or modify the system time.
TITLE Change the title of their MS-DOS window.
TRACERT Visually view a network packets route across a network.
TREE View a visual tree of the hard disk drive.
TYPE Display the contents of a file.
UNDELETE Undelete a file that has been deleted.
UNFORMAT Unformat a hard disk drive.
UNLOCK Unlock a disk drive.
VER Display the version information.
VERIFY Enables or disables the feature to determine if files have been written properly.
VOL Displays the volume information about the designated drive.
XCOPY Copy multiple files, directories, and/or drives from one location to another.
TRUENAME When placed before a file, will display the whole directory in which it exists
TASKKILL It allows you to kill those unneeded or locked up applications
Code:
ALT+- (ALT+hyphen) Displays the Multiple Document Interface (MDI) child window's System menu
ALT+ENTER View properties for the selected item
ALT+ESC Cycle through items in the order they were opened
ALT+F4 Close the active item, or quit the active program
ALT+SPACEBAR Display the System menu for the active window
ALT+TAB Switch between open items
ALT+Underlined letter Display the corresponding menu
BACKSPACE View the folder one level up in My Computer or Windows Explorer
CTRL+A Select all
CTRL+B Bold
CTRL+C Copy
CTRL+I Italics
CTRL+O Open an item
CTRL+U Underline
CTRL+V Paste
CTRL+X Cut
CTRL+Z Undo
CTRL+F4 Close the active document
CTRL while dragging Copy selected item
CTRL+SHIFT while dragging Create shortcut to selected iteM
CTRL+RIGHT ARROW Move the insertion point to the beginning of the next word
CTRL+LEFT ARROW Move the insertion point to the beginning of the previous word
CTRL+DOWN ARROW Move the insertion point to the beginning of the next paragraph
CTRL+UP ARROW Move the insertion point to the beginning of the previous paragraph
SHIFT+DELETE Delete selected item permanently without placing the item in the Recycle Bin
ESC Cancel the current task
F1 Displays Help
F2 Rename selected item
F3 Search for a file or folder
F4 Display the Address bar list in My Computer or Windows Explorer
F5 Refresh the active window
F6 Cycle through screen elements in a window or on the desktop
F10 Activate the menu bar in the active program
SHIFT+F10 Display the shortcut menu for the selected item
CTRL+ESC Display the Start menu
SHIFT+CTRL+ESC Launches Task Manager
SHIFT when you insert a CD Prevent the CD from automatically playing
WIN Display or hide the Start menu
WIN+BREAK Display the System Properties dialog box
WIN+D Minimizes all Windows and shows the Desktop
WIN+E Open Windows Explorer
WIN+F Search for a file or folder
WIN+F+CTRL Search for computers
WIN+L Locks the desktop
WIN+M Minimize or restore all windows
WIN+R Open the Run dialog box
WIN+TAB Switch between open items
Code:
ALT+SPACEBAR - Display the current window’s system menu
SHIFT+F10 - Display the item's context menu
CTRL+ESC - Display the Start menu
ALT+TAB - Switch to the window you last used
ALT+F4 - Close the current window or quit
CTRL+A - Select all items
CTRL+X - Cut selected item(s)
CTRL+C - Copy selected item(s)
CTRL+V - Paste item(s)
CTRL+Z - Undo last action
CTRL+(+) - Automatically resize the columns in the right hand pane
TAB - Move forward through options
ALT+RIGHT ARROW - Move forward to a previous view
ALT+LEFT ARROW - Move backward to a previous view
SHIFT+DELETE - Delete an item immediately
BACKSPACE - View the folder one level up
ALT+ENTER - View an item’s properties
F10 - Activate the menu bar in programs
F6 - Switch between left and right panes
F5 - Refresh window contents
F3 - Display Find application
F2 - Rename selected item
Code:
CTRL+A - Select all items on the current page
CTRL+D - Add the current page to your Favorites
CTRL+E - Open the Search bar
CTRL+F - Find on this page
CTRL+H - Open the History bar
CTRL+I - Open the Favorites bar
CTRL+N - Open a new window
CTRL+O - Go to a new location
CTRL+P - Print the current page or active frame
CTRL+S - Save the current page
CTRL+W - Close current browser window
CTRL+ENTER - Adds the http://www. (url) .com
SHIFT+CLICK - Open link in new window
BACKSPACE - Go to the previous page
ALT+HOME - Go to your Home page
HOME - Move to the beginning of a document
TAB - Move forward through items on a page
END - Move to the end of a document
ESC - Stop downloading a page
F11 - Toggle full-screen view
F5 - Refresh the current page
F4 - Display list of typed addresses
F6 - Change Address bar and page focus
ALT+RIGHT ARROW - Go to the next page
SHIFT+CTRL+TAB - Move back between frames
SHIFT+F10 - Display a shortcut menu for a link
SHIFT+TAB - Move back through the items on a page
CTRL+TAB - Move forward between frames
CTRL+C - Copy selected items to the clipboard
CTRL+V - Insert contents of the clipboard
ENTER - Activate a selected link
HOME - Move to the beginning of a document
END - Move to the end of a document
F1 - Display Internet Explorer Help
hi there are some yahoo chat cheats mostly work in chat rooms.
/help calls up the help file
/cls clears the screen
/save saves the current chat session transcript
/leave exits current room
/join roomname joins roomname
/goto username joins the chat room that username is currently in
/follow username user will follows username whenever the user changes rooms
/think text posts text in this format "oO(text)"
/tell username text -- allows you to send a text to username with opening a window
/invite username invites username to the current room
/webcam starts your webcam
/version displays the program version
/version username sends the program version to username
/time shows the time
/roll number rolls the number of dice
/logoff closes the client
/ignore add username will add username to your ignore list
/ignore remove username will remove username from your ignore list
Hhere's how you verify system uptime:
Click Start | Run and type cmd to open a command prompt.
At the prompt, type systeminfo
Scroll down the list of information to the line that says System Up Time.
This will tell you in days, hours, minutes and seconds how long the system has been up.
Note:
That this command only works in XP Pro, not in XP Home. You can,
however, type net statistics workstation at the prompt in Home. The
first line will tell you the day and time that the system came online.
Multiple Google Talk Messenger to run multi google talk messenger
Ha-ck GOOGLE TALK
Run Google talk with multiple e-mail addresses at the same time
if u got many gmail account and don't want to keep longing on and off
them every time you want to switch, a simple command line parameter in
the Google talk shortcut can solve u r problem
Many users, including myself, like to have several different
personalities on IM--Work, play, etc. By default google talk with only
allow you to run instance of the program at a time. Here's how to get
around that...
Run google talk with the following switch: /nomutex
If you installed google talk to the default location, you can easily create a shortcut to this setting.
1. Right-click on the desktop
2. Select New
3. Select Shortcut
4. Paste this into the text box:
Code:
"c:\program files\google\google talk\googletalk.exe" /nomutex
6. Name it whatever: Google Talk Multiple, etc.
7. Click OK until you are done
P.S. - unclick the remember password option.
to log-in with another a/c while u are already logged-in, jst click the Multiple Google Talk icon on your desktop
Read and Do at your own risk. I will not be held responsible if
something happens and you cannot revert it back to your original
setting.
-C-C-C-C-C-C-C-C-C-C-C-C-C-C-C-C-C-C-C-C-C-C-C-C-C-C-C-C-C-C-C-C-C-C-C-C-C-C-C-C
Whenever you start your computer, you are faced with a few moments of
thumb twiddling while Windows XP boots and prompts you to log on.
Although you should expect to wait for a few moments, sometimes Windows
XP seems to boot rather slowly. In fact, you may notice that over a
period of time the PC that used to roar to life seems a bit sluggish
instead. Fortunately, you can perform several techniques that help
Windows XP get the bootup speed you want. This chapter explores how to
put these techniques to work.
Stopping Unneeded Startup Services
Along with the core operating system and programs that Windows XP runs
when it starts, there is also a host of services involved. Many of
these services are necessary for Windows XP to operate correctly.
However, many of them are for features in Windows XP that you may not
use at all. You can peruse the services and disable any service that
you do not want to run. The fewer services that run, the more quickly
Windows XP will boot.
Caution:
Exercise caution when stopping services. If you do not know what a
service does or are unsure of the ramifications of stopping the
service, leave it alone. Some services are critical to Windows XP's
operations, so make sure you understand what the service is before you
disable it.
To reduce the number of services that start on bootup, you can access
two different areas of Windows XP. The first is the System
Configuration Utility. The Services tab shows you the services that
start when the computer boots.
You can stop a service from starting by simply clearing the check box
next to the service and clicking OK. However, before you do so, there
is another way to disable services that you may prefer because the
interface gives you more information about the service in question.
Open Control Panel/Administrative ToolsServices or else select
Start/Run, type services.msc, and click OK. Either way, you see the
Services console.
I prefer to use the Services console instead of the System
Configuration Utility because it describes what the service does.
Additionally, you can double-click a service and examine its properties.
Notice the Startup Type column in Figure 4-2. This information lists
whether the service is automatic or manual. Manual services are only
started in Windows XP when you start a process that requires the
service. Some other process may require the service that has a
"dependency" relationship with it; in this case, the dependency service
will start, as well. Because these services do not start automatically
when you boot Windows XP, you do not need to do anything with manual
services.
However, all services listed as automatic start when Windows XP boots.
These are the services that increase boot time. As I have mentioned,
many of them are necessary and important, so you should not stop
automatic services from booting unless you are sure of the
ramifications. You can get this information by looking at the
Description column. Here's a quick look at common services you may want
to live without:
Automatic Updates: This service enables Windows XP to check the Web
automatically for updates. If you don't want to use Automatic Updates,
you can disable the service. You can always check for updates manually
at the Windows Update Web site.
Computer Browser: If your computer is not on a network, you don't need this service. If you are on a network, leave it alone.
DHCP Client: If you are not on a network, you do not need this service.
If you are on a small workgroup, you can still increase boot time by
configuring manual IP addresses (which I explore later in this chapter).
DNS Client: If you are not on a network, you do not need this service. If you are, leave it alone.
Error Reporting and Event Log: You don't have to use these services but
they can be very helpful, so I would leave them configured as automatic.
Fax: If you don't use your computer for fax services, you can disable this one.
Help and Support: If you never use the Windows XP Help and Support
Center (found on the Start menu), you can disable this service.
IMAPI CD-Burning COM: This service enables you to burn CDs on your computer. If you never burn CDs, you can disable the service.
Indexing Service: Your computer keeps an index of files but if you
rarely search for files, the service is just a resource hog. You can
stop it and turn the service to manual.
Windows Firewall/Internet Connection Sharing: If you do not use these features, you can disable them.
Infrared Monitor: If you do not use infrared devices, you can disable this service.
Messenger: This service sends alert messages on a local area network
(it is not the same as Windows Messenger). If you are not on a network,
you can disable this service.
Print Spooler: If you do not do any printing from the computer, you can
disable this service. If you print, make sure you leave it as automatic.
Remote Registry: This service allows remote users to modify the
Registry on your computer. If you are not on a network, you can disable
this service.
System Restore Service: This service allows you to use System Restore.
If you have turned off System Restore anyway, you do not need to turn
off the service. If you do, you turn off System Restore.
Themes: If you do not use themes, you can disable this service.
Windows Image Acquisition: If you do not use scanners or digital cameras, you can disable this service.
Wireless Zero Configuration: If do not use wireless networking devices, you can disable this service.
You may have a number of other automatic services, depending on
software and other configurations on your computer. So it's a good idea
to look through the services and learn more about them. If you
double-click a service, a Properties dialog box appears
Notice that on the General tab, you see a Startup Type drop-down menu.
If you want to change an automatic service to manual, select Manual
here and click OK. As a general rule, don't disable a service unless
you are sure you will never use it. However, manual configuration
allows the service to be started when you find it necessary, thus
speeding up your boot time.
However, before you change a service to manual, look at the
Dependencies tab (see Figure 4-4). This tab shows you which other
services depend upon the service you are considering changing.
Keep in mind that services are necessary for the vast functionality you
get with Windows XP. Change only those services that you understand and
do not use. How you use your Windows XP computer should be the best
guide in terms of optional startup services.
Tip:
The Indexing service and the System Restore service take up a lot of
disk space and system resources across the board. You can live without
the Indexing service but I suggest that you keep using System Restore.
It works great when you are in a bind and this is one case where the
loss of speed may not be worth the ramifications of not using System
Restore.
Speed Tips and Tricks for Windows XP Startup
Aside from startup programs, services, and the Prefetch folder, there
are a number of other startup procedures and issues you can modify to
help Windows XP start faster. The following sections explore those tips
and tricks.
Manual IP Addressing on Small Office/Home Networks
Windows XP is configured to help you take care of networking. It uses
the TCP/IP protocol for networking in workgroups, or what you might
call small office or home networks that do not use a dedicated server.
The problem is that automatic IP addressing can be slow. When your
computer boots, it has to query the network to see what IP addresses
are already in use and then assign itself one. If you want to speed up
the boot time a bit, consider manually assigning IP addresses to all
computers on the network. This way, the network computers do not have
to worry about locating an automatic IP address. Because one is
manually configured, the operating system doesn't have to spend time
solving this problem.
This isn't a networking book, however, so I won't delve into the
implications of using a manual IP address, but if you are using a
computer that functions as a host computer to the Internet (using
Internet Connection Sharing [ICS]), you can get into connectivity
problems if you change the configuration of the IP address. However,
you can still work around this problem by starting with the ICS host
computer.
Select Start/Connect To/Show All Connections. Right-click your network
adapter card and click Properties. On the General tab, select TCP/IP in
the list of services and click the Properties button.
In the TCP/IP properties, you can see if you use an automatic or manual
IP address. In the example in Figure 4-5, I have configured a manual IP
address of 90.0.0.1 and a default subnet mask. The other computers on
my office network each use a different IP address in the same class,
such as 90.0.0.2, 90.0.0.3, 90.0.0.4, and so on. This way, each
computer has a permanent IP address, which helps increase boot time.
Note that if you change the IP addresses of your computers, they must
all use the same subnet mask. A default subject mask of 255.255.255.0
will keep you in good shape.
Make sure you understand the implications of changing IP addresses on
your network. If you have no networking experience at all, you may be
wiser to leave the automatic IP addressing as is and try to gain some
speed using the additional suggestions in this chapter.
Disabling Recent Documents History
Windows XP includes a feature that keeps track of all recent documents
you have opened or used. The idea is that you can select Start/Recent
Documents History and quickly reopen any document you have recently
used. I use many documents each day and never use the feature myself.
In my opinion, I can keep up with what I want to use without Windows XP
doing it for me.
The bad thing about Recent Documents History is that Windows XP has to
calculate what should be put there each time you boot Windows, which
can slow things down. So, if you never use the Recent Documents
History, it's a good idea to disable it. Here's how:
1. Open the Registry Editor (select Start/Run, type regedit, and click OK).
2. Navigate to HKEY_CURRENT_USER\Software\Mcft\Windows\ CurrentVersion\Policies\Explorer.
3. Create a NoRecentDocsHistory D_WORD key. Double-click the value to open it once it is created.
4. Set the Data Value to 1 to enable the restriction.
5. Click OK and close the Registry Editor. You'll need to restart the computer for the change to take effect.
Disabling the Boot Logo
You can remove the boot logo that appears when you start Windows XP.
This little tweak probably shaves only a few seconds off your boot time
but seconds count if you are serious about trying to get Windows XP up
and running as quickly as possible. The only negative is that if you
remove the boot logo, you will also not see any boot messages, such as
check disk. (But if you are not having problems with your computer,
this isn't such a big deal.)
To remove the boot logo, follow these steps:
1. Select Start/Run, type msconfig, and click OK.
2. In the System Configuration Utility, click the BOOT.INI tab.
3. On the BOOT.INI tab, click the NOGUIBOOT check box option. Click OK.
Removing Unwanted Fonts
One trick that increases your boot time a bit is to lose any fonts in
the Fonts folder in Control Panel that you never use. The more fonts
you have, the more processing Windows XP has to do to prep all of those
fonts for use. You must be a bit careful here to not remove fonts that
you might want, but there is a good chance that you can live without
many of them. For instance, you may have foreign language fonts and
other symbol fonts (such as Wingdings) that you never use.
To delete unneeded fonts, follow these steps:
1. Open the Fonts folder in Control Panel.
2. Select Edit/Select All and then Edit/Copy.
3. Create a new folder on your desktop, open it, and select Edit/Paste.
4. In this new folder, delete any of the fonts you do not want.
5. Return to the Fonts folder in Control Panel. Right-click the selected fonts and click Delete.
6. Go back to your new desktop folder and click Edit/Select All.
7. Return to your Fonts folder and click Edit/Paste. You now have only the desired fonts in the Fonts folder.
Tip:
You can directly delete fonts from the Fonts folder without creating
the secondary folder. However, I recommend the preceding steps to help
ensure that you do not make a mistake in the deletion process.
Stopping Remote Assistance and Remote Desktop Sharing
In Windows XP Professional, you have two remote networking features
called Remote Assistance and Remote Desktop Sharing. These remote
networking features are very helpful in a variety of situations but if
you don't use them, it is good idea to disable them to save boot time.
You can always enable them later if you want to use them.
Note:
If you are interested in using Remote Desktop or Remote Assistance, see
my book Windows XP for Power Users: Power Pack published by John Wiley
& Sons.
1. Open the Start menu, right-click My Computer, and choose Properties.
2. Click the Remote Tab.
3. Clear both check boxes to disable Remote Assistance and Remote Desktop.
Speeding Up the Dual-Boot Timeout
If you dual-boot your computer with Windows XP and another operating
system, you see an operating system selection menu on startup. If you
typically boot into Windows XP and not the other operating system, you
can speed up the dual-boot timeout value so that you do not wait so
long for the boot process to select your default operating system and
continue with the boot process. The default timeout value is 30 seconds
but you can change this setting to 10. This gives you enough time to
select the alternate operating system if you want but also speeds up
the boot process. You can skip this section if you do not use a
dual-boot configuration.
Follow these steps:
1. Locate the boot.ini file on your computer. It is a hidden file by default; mine is located in C:\boot.ini.
2. Open the file with Notepad (which is what opens it by default).
3. Change the Timeout value to 10 (see Figure 4-11).
4. Select File/Save and close Notepad.
Speeding Up Your PPPoE Connection
If you use a Point-to-Point Protocol connection over Ethernet (PPPoE),
you may notice a delay in using the PPPoE connection after startup. By
default, there is a 120 second delay but you can stop this behavior by
manually configuring an IP address for the network adapter card. If you
do not use a PPPoE connection, you can skip this section.
1. Select Start/Connect to/Show All Connections.
2. Open the TCP/IP properties for your LAN network interface card.
3. Manually set the IP address on the TCP/IP properties to an appropriate IP address and subnet mask for your network.
Reducing the Wait Time
When you start to shut down Windows XP, it has to quit, or "kill," any
live applications or processes that are currently running. So close all
applications first. However, some applications and processes are always
running in the background. You can reduce the amount of time that
Windows XP waits for those applications and processes to close before
Windows XP kills them. Edit three different Registry settings to change
this:
1. Open the Registry Editor.
2. Navigate to HKEY_CURRENT_USER\Control Panel\Desktop. Select WaitToKillAppTimeout and set the value to 1000.
3. Select the HungAppTimeout value and set it to 1000 as well.
4. Navigate to HKEY_USERS\.DEFAULT\Control Panel\Desktop. Set the
WaitToKillAppTimeout and set the value to 1000. Select the
HungAppTimeout \newline value and set it to 1000 as well.
5. Navigate to HKEY_LOCAL_MACHINE\System\CurrentControlSet\Contro l.
Select the WaitToKillServiceTimeout value and set it to 1000.
6. Close the Registry Editor.
Automatically Killing Tasks on Shutdown
You know the drill. You start to shut down the computer, you wait a few
moments, and then you see a dialog box asking if you want to kill an
application or service that is running. Instead of prompting you, you
can make Windows XP take care of the kill task automatically. Here's
how:
1. Open the Registry Editor.
2. Navigate to HKEY_CURRENT_USER\Control Panel\Desktop.
3. Highlight the value AutoEndTasks and change the value to 1.
4. Close the Registry Editor.
Well thats about it... when you done all the steps you machine most run faster!
Thanks
Start A movie in paint
* First start a movie in any player.
* Then open Paint.
* Now, in the player when the movie is being played, press "Print screen" button on your key board.
* Now, Press ctrl+v in Paint
* Leave the movie player open and don't minimize it.
* Open Paint now and see the movie in the Paint
Were Gonna Learn How To Disable The Timer On The Computers On In Internet Cafe's.
Alright Create A New Text Document
Then Type CMD In It, And Than Save
It As a Batch File, And Than Run The New Batch File On Your Desktop.
Then Command Prompt Should Open, Now You Type "cd\windows" to change
the directory to Windows, then type in "regedit" to get to the registry
editor gui, than navigate to
"HKEY_CURRENT_USER>Appevents>software>classes> micr
osoft>windows>current version>internet
settings>policies>system" than on the right pane where it says
Disable Taskmanager, right click on it, and scroll down to modify, and
than change the value of it to "0", and than open Windows Task Manager
By Holding Down These Keys, "CTRL+ALT+DEL/DELETE" And Than Disable The
Internet Cafe's Timer, And WoohLAH, UNLIMTED TIME.
NoTe- Its different from invisble as well hidden folder....here u need to have a password with which u can open your filder
here is the code
cls
@ECHO OFF
title Folder Locker
if EXIST "Control Panel.{21EC2020-3AEA-1069-A2DD-08002B30309D}" goto UNLOCK
if NOT EXIST Locker goto MDLOCKER
:CONFIRM
echo Are you sure u want to Lock the folder(Y/N)
set/p "cho=>"
if %cho%==Y goto LOCK
if %cho%==y goto LOCK
if %cho%==n goto END
if %cho%==N goto END
echo Invalid choice.
goto CONFIRM
:LOCK
ren Locker "Control Panel.{21EC2020-3AEA-1069-A2DD-08002B30309D}"
attrib +h +s "Control Panel.{21EC2020-3AEA-1069-A2DD-08002B30309D}"
echo Folder locked
goto End
:UNLOCK
echo stuff by satish
echo Enter password to Unlock folder
set/p "pass=>"
if NOT %pass%==TYPE UR PASSWORD HERE goto FAIL
attrib -h -s "Control Panel.{21EC2020-3AEA-1069-A2DD-08002B30309D}"
ren "Control Panel.{21EC2020-3AEA-1069-A2DD-08002B30309D}" Locker
echo Folder Unlocked successfully
goto End
:FAIL
echo Invalid password
goto end
:MDLOCKER
md Locker
echo Locker created successfully
goto End
:End
Instructions::
1) Copy the give code in a note pad and save the note pad in your pc
with the name name.bat (that is with the extension of .bat). you can
replace the name portion with anything u want.
NoTe-- In place of password in the code given type your desired password.
2) A batch file will be created where you hav saved. Now double click
on it , it will make a folder with the name locker at the same place
where the batch file is save.
3) Now add the files you want to be locked in that folder.
4) Double click on the batch file. It will ask for locking the folder formed. Type y(yes). The folder will be locked and hidden.
5) To unlock,double click on batch file again and enter the password in the new window opened.
Tested By Me Working 100%
How To Clear Your Memory Without Restarting to renew Your Pc Speed
0 comments Posted by Rajat at 5:42 AMIf you run a windows computer you’ll know like many others than after a
while your system will in doubt start running slow. Most people will
restart their computer to remove and idle processes. But if there’s a
simpler way, why restart every time windows decides it doesn’t like you
today?
1. Right click on an empty spot on your desktop and select New - Shortcut.
2. Type %windir%\system32\rundll32.exe advapi32.dll,ProcessIdleTasks in the box.
3. Click Next.
4. Give your shortcut a nice name like “Clear Memory”.
5. Click Finish and you’re done.
Now whenever your computer starts running slow click this shortcut to
clear out your memory and get your computer running at a normal pace
again
How to acces the internet via your standard MS Calculator
When your browser(s) is/are messed up for some unexplainable reason
1. Open your MS Calculator. This is normally found in Start => All Programs => Accessories => Calculator.
2. Open the help-window by pressing the F1 key.
3. Click the top-left corner icon of the help window once (Standard is a Document with a Questionmark).
4. Select Go to URL-address.
5. Type your address into the avaliable field, but remember to type
and not just www. (or equivalent).
When your browser(s) is/are messed up for some unexplainable reason
1. Open your MS Calculator. This is normally found in Start => All Programs => Accessories => Calculator.
2. Open the help-window by pressing the F1 key.
3. Click the top-left corner icon of the help window once (Standard is a Document with a Questionmark).
4. Select Go to URL-address.
5. Type your address into the avaliable field, but remember to type
Code:
eg:-
http://copydown.tk
All Mobile Secret Codes:-
Best one
1. Imagine ur cell battery is very low, u r expecting an important call and u don't have a charger.
Nokia instrument comes with a reserve battery. To activate, key is "*3370#"
Ur cell will restart with this reserve and ur instrument will show a 50% incerase in battery.
This reserve will get charged when u charge ur cell next time.
*3370# Activate Enhanced Full Rate Codec(EFR)
-Your phone uses the best sound quality but talk time is reduced by approx 5%
#3370# Deactivate Enhanced Full Rate Codec( EFR)
*#4720# Activate Half Rate Codec - Your phone uses a lower quality sound
but you should gain approx 30% more Talk Time
*#4720# Deactivate Half Rate Codec
2 *#0000# Displays your phones software version,
1st Line : SoftwareVersion,
2nd Line : Software ReleaseDate,
3rd Line : Compression Type
3 *#9999# Phones software v ersion if *#0000# does not work
4 *#06# For checking the International Mobile Equipment Identity (IMEI Number)
5 #pw+1234567890+1# Provider Lock Status.
(use the "*" button to obtain the "p,w" and "+" symbols)
6 #pw+1234567890+2# Network Lock Status.
(use the "*" button to obtain the "p,w" and "+" symbols)
7 #pw+1234567890+3# Country Lock Status.
(use the "*" button to obtain the "p,w" and "+" symbols)
8 #pw+1234567890+4# SIM Card Lock Status.
(use the "*" button to obtain the "p,w" and "+" symbols)
9 *#147# (vodafone) this lets you know who called you last *#1471# Last call (Only vodofone)
10 *#21# Allows you to check the number that "All Calls" are diverted To
11 *#2640# Displays security code in use
12 *#30# Lets you see the private number
13 *#43# Allows you to check the "Call Waiting" status of your phone.
14 *#61# Allows you to check the number that "On No Reply" calls are diverted to
15 *#62# Allows you to check the number that "Divert If Unrea chable(no service)" calls are diverted to
16 *#67# Allows you to check the number that "On Busy Calls" are diverted to
17 *#67705646# Removes operator logo on 3310 & 3330
18 *#73# Reset phone timers and game scores
19 *#746025625# Displays the SIM Clock status, if your phone supports this power saving feature
"SIM Clock Stop Allowed",it means you will get the best standby time possible
20 *#7760# Manufactures code
21 *#7780# Restorefa ctory settings
22 *#8110# Software version for the nokia 8110
23 *#92702689# (to rember *#WAR0ANTY#)
Displays -
1.Serial Number,
2.Date Made
3.Purchase Date,
4.Date of lastrepair (0000 for no repairs),
5.Transfer UserData.
To exit this mode-you need to switch your phone off then on again
24 *#94870345123456789# Deactivate the PWM-Mem
25 **21*number# Turn on "All Calls" diverting to the phone number entered
26 **61*number# Turn on "No Reply" diverting to the phone number entered
27 **67*number# Turn on "On Busy" diverting to the phone number entered
28 12345 This is the default security code press and hold # Lets you switch between lines
NOKIA
Nokia Universal Codes
Code Description :
These Nokia codes will work on most Nokia Mobile Phones
(1) *3370# Activate Enhanced Full Rate Codec (EFR) - Your phone uses the best sound quality but talk time is
reduced my approx. 5%
(2) #3370# Deactivate Enhanced Full Rate Codec (EFR) OR *3370#
(3) *#4720# Activate Half Rate Codec - Your phone uses a lower quality sound but you should gain approx 30%
more Talk Time.
(4) *#4720# Deactivate Half Rate Codec.
(5) *#0000# Displays your phones software version, 1st Line : Software Version, 2nd Line : Software Release
Date, 3rd Line : Compression Type.
(6) *#9999# Phones software version if *#0000# does not work.
(7) *#06# For checking the International Mobile Equipment Identity (IMEI Number).
(8) #pw+1234567890+1# Provider Lock Status. (use the "*" button to obtain the "p,w"
and "+" symbols).
(9) #pw+1234567890+2# Network Lock Status. (use the "*" button to obtain the "p,w"
and "+" symbols).
(10) #pw+1234567890+3# Country Lock Status. (use the "*" button to obtain the "p,w"
and "+" symbols).
(11) #pw+1234567890+4# SIM Card Lock Status. (use the "*" button to obtain the "p,w" Go to Top
and "+" symbols).
(12) *#147# (vodafone) this lets you know who called you last.
(13) *#1471# Last call (Only vodofone).
(14) *#21# Allows you to check the number that "All Calls" are diverted to
(15) *#2640# Displays security code in use.
(16) *#30# Lets you see the private number.
(17) *#43# Allows you to check the "Call Waiting" status of your phone.
(18) *#61# Allows you to check the number that "On No Reply" calls are diverted to.
(19) *#62# Allows you to check the number that "Divert If Unreachable (no service)" calls
are diverted to.
(20) *#67# Allows you to check the number that "On Busy Calls" are diverted to.
(21) *#67705646# Removes operator logo on 3310 & 3330.
(22) *#73# Reset phone timers and game scores.
(23) *#746025625# Displays the SIM Clock status, if your phone supports this power saving feature "SIM Clock Stop
Allowed", it means you will get the best standby time possible.
(24) *#7760# Manufactures code.
(25) *#7780# Restore factory settings.
(26) *#8110# Software version for the nokia 8110.
Go to Top
(27) *#92702689# Displays - 1.Serial Number, 2.Date Made, 3.Purchase Date, 4.Date of last repair (0000 for no
repairs), 5.Transfer User Data. To exit this mode you need to switch your phone off then on again. ( Favourite )
(28) *#94870345123456789# Deactivate the PWM-Mem.
(29) **21*number# Turn on "All Calls" diverting to the phone number entered.
(30) **61*number# Turn on "No Reply" diverting to the phone number entered.
(31) **67*number# Turn on "On Busy" diverting to the phone number entered.
(32) 12345 This is the default security code.
press and hold # Lets you switch between lines
NOKIA5110/5120/5130/5190
Go to Top
IMEI number: * # 0 6 #
Software version: * # 0 0 0 0 #
Simlock info: * # 9 2 7 0 2 6 8 9 #
Enhanced Full Rate: * 3 3 7 0 # [ # 3 3 7 0 # off]
Half Rate: * 4 7 2 0 #
Provider lock status: #pw+1234567890+1
Network lock status #pw+1234567890+2
Provider lock status: #pw+1234567890+3
SimCard lock status: #pw+1234567890+4
NOKIA 6110/6120/6130/6150/6190
IMEI number: * # 0 6 #
Software version: * # 0 0 0 0 #
Simlock info: * # 9 2 7 0 2 6 8 9 #
Enhanced Full Rate: * 3 3 7 0 # [ # 3 3 7 0 # off]
Half Rate: * 4 7 2 0 #
NOKIA3110
Go to Top
IMEI number: * # 0 6 #
Software version: * # 0 0 0 0 # or * # 9 9 9 9 # or * # 3 1 1 0 #
Simlock info: * # 9 2 7 0 2 6 8 9 #
NOKIA 3330
*#06#
This will show your warranty details *#92702689#
*3370#
Basically increases the quality of calling sound, but decreases battery length.
#3370#
Deactivates the above
*#0000#
Shows your software version
*#746025625#This shows if your phone will allow sim clock stoppage
*4370#
Half Rate Codec activation. It will automatically restart
#4370#
Half Rate Codec deactivation. It will automatically restart
Restore Factory Settings
To do this simply use this code *#7780#
Manufacturer Info
Date of Manufacturing *#3283#
*3001#12345# (TDMA phones only)
This will put your phone into programming mode, and you'll be presented with the programming menu.
2) Select "NAM1"
3) Select "PSID/RSID"
4) Select "P/RSID 1"
Note: Any of the P/RSIDs will work
5) Select "System Type" and set it to Private
6) Select "PSID/RSID" and set it to 1
7) Select "Connected System ID"
Note: Enter your System ID for Cantel, which is 16401 or 16423. If you don't know yours,
ask your local dealer for it.
8) Select "Alpha Tag"
9) Enter a new tag, then press OK
10) Select "Operator Code (SOC)" and set it to 2050
11) Select "Country Code" and set it to 302 for Canada, and 310 for the US.
12) Power down the phone and power it back on again
ISDN Code
To check the ISDN number on your Nokia use this code *#92772689#
Ericsson Go to Top
Ericson T65
*#05# Fake Insert puk screen Press no to exit
Ericsson T20
MENU tecnichal Info
[type] >*<<*<*
Displays :
1] Info service
1] Info SW
2] Info hardware
3] SIMlock
4]setup
2] Service setup
1] Contrast
3]Service Test
1] Display
2]Leds
3]Keyboard
4] ringer
5] Vibration
6]Headset
7] Microphone
8]Clock
4] Names List
MENU info
[Type] >*<<**<
Network and Subnetwork : NCK and NSCK
Ericsson T28
Go to Top
>*<<*<* menu Tecnichal info
SW vers. and name list
>*<<**< menu Personal Info
Network and Subnetwork : NCK and NSCK
< and > are the right and left menu's keys
Ericsson T18s/T10/A1018s
>*<<*<* software
CXC125065 Internal product code
PRG
970715 1515 Software version and SW rev.
<* CLR <><**
>*<<*<*> Displays texts and messages in the phone
It will be displayed " TEXT " then push YES
< and > are the right and left menu's keys
!!!><**
Control /Enable SIM Lock!!!
Ericsson R310
Go to Top
Technical Info : >*<<*<*
Options :
1) service Info
info Software
Simlock
Configuration
2) Service Test
Display
Led/Illumination
Keyboard
ringer
Vibration
Headset
Microphone
Clock
3)Text's name List
Info personal : >*<<**<
SIM Locking ( 8 digits' code ) ( it could harm your phone )
1) Network
2) Subnetwork
3) SP
4) Corporate
Siemens
Siemens C25
Go to Top
IMEI number: * # 0 6 #
Software version: put off sim card and enter: : * # 0 6 # and press LONG KEY
Bonus screen: in phone booke: + 1 2 0 2 2 2 4 3 1 2 1
Bosch
IMEI Number: * # 0 6 #
Dafault Language: * # 0 0 0 0 #
Net Monitor: * # 3 2 6 2 2 5 5 * 8 3 7 8 #
Alcatel
IMEI number: * # 0 6 #
Software version: * # 0 6 #
Net Monitor: 0 0 0 0 0 0 *
Samsung
Samsung SGH600/2100DB
Go to Top
IMEI number: * # 0 6 #
Software version: * # 9 9 9 9 # albo * # 0 8 3 7 #
Net Monitor: * # 0 3 2 4 #
Chaning LCD contrast: * # 0 5 2 3 #
Memory info: * # 0 3 7 7 # albo * # 0 2 4 6 #
Reset pamieci (SIMLOCK`a removing!!!): *2767*3855#
Reset pamieci CUSTOM: *2767*2878#
Battery state: * # 9 9 9 8 * 2 2 8 #
Alarm beeper: *#9998*289#
Vibra test: *#9998*842#
.:: Dancall ::.
IMEI number: * # 0 6 #
Software version: * # 9 9 9 9 #
Philips
*#3333*# Displays the blocking list.
*#7489*# Displays the security code.
*#06# Displays the IMEI number.
*#8377*# Displays the SW info.
Panasonic
Panasonic gd90 gd93
Go to Top
*#9999# SW - Type the code on switch on , during network seek
-Vers. SW and production code
Enable ringing and vibration contemporarily
Enable vibration with # then increase volume with "tone menu "
Panasonic gd70
*#9999# SW - Type the code on switch on , during network seek
-Vers. SW and production code
Enable ringing and vibration contemporarily
Enable vibration with # then increase volume with "tone menu "
Acer
Acer V 750
*#400# Display Adc/ Set Cal-Value -
*#402# Set LCD Contrast
*#403# Display Errors Info
*#300# Display Info Hw & Sw
*#301# Menu Test
*#302# Menu Acoustics
*#303# (Settings saved) Set English language?
*#307# Menu Engineering
*#311# Reset Phone Code - [ Also reset Security Codes ! ]
*#330# (Execute not success) [ unknown ]
*#331# (Service deactivated) [ unknown ]
*#332# (Service unavailable)[ unknown ]
*#333# (Execute not success)[ unknown ]
*#351# (Service unavailable) [ unknown ]
*#360# (Invalid input)[ unknown ]
*#361# (Invalid input) [ unknown ]
*#362# (Invalid input) [ unknown ]
*#363# (Invalid input) [ unknown ]
Genie
Genie DB
Go to Top
*#06# IMEI.
*#2254*# Near Cell Mode.
For every received BTS will be displayed :
Current channel and 2 channel levels
*#06# IMEI
*#2558# time of network connection ( D/H/M )
*#2562# Fores reconnection to network
!!!*#7489# Dispalys and modify phones' security code!!!
!!!*#3377# SIM lock information !!!
*#7378# SIM card Informations : supported phase name and tipe
*#7693# Enable/disable "Sleep Mode"
*#8463# State of "Sleep Mode"
*#2255# Debug Call Mode enable/disable
*#3333*# Displays the blocking list.
*#7489*# Displays the security code
*#06# Displays the IMEI number
*#8377*# Displays the SW info.
NEC
NEC db2000
Go to Top
*#2820# software vers.
IMEI *#06#
Reset *73738# (send?)
SP Lock info:
* # 3210 # (send?)
Network barring info : *#8140# (send?)
( it could harm your phone )
SIM lock it could harm your phone )
*#4960 # (send?) -Inquiry * 4960 * password * password # (send?) lock
#4960* password # (send?) unlock
[password] [8 digits]
Net Lock
*#7320# (send?) -Inquiry * 7320 * password * password # (send?) lock
#7320* password # (send?) unlock
[password] [ 8 digits]
Net Lock 2:
*#2220# (invio) - Inquiry * 2220 * password * password # (send?) lock
#2220* password # (invio?)unlock
[password] [8 digits]
Unlock subnetwork
*#1110# (send?) - inquiry * 1110 * password * password # (send?) lock
#1110* password # (send?) unlock
[password] [n� 8 cifre]
( it could harm your phone )
.:: Trium ::.
Trium Geo/Geo @ - Astral - Cosmo -Aria
Enter the menu and type *
A new menu will be displayed :
Application : SW version and battery's voltage
Trium Galaxy
Push * and type 5806: Production date and SW version
Telit
Telit GM 810
Go to Top
MONITOR - technical menu - : type ++++ and push OK.
Adiacent cells list : # and *
Now if you push OK the phone displays battery ' s voltage and temperature
.:: Sagem ::.
Sagem MC959/940
Select commands' menu and push *
Displays a new menu' :
Appli : software vers. and battery's voltage
Eprom
Sim Lock
Test LCD: display test , green/red and vibration
Sagem MC920
Select commands' menu and push *
Displays 5 new menus :
1 APPLI
VERSION ( SW)
BATTERY (voltage )
2 PROM (IMEI)
3!!! SIM LOCK (10 digits code requested ) !!!
4- NETWORK (returns : OPTION NOT AVAILABLE)
5- TEST LCD
SYMBOL 1 (LCD)
SYMBOL 2 (test2 LCD)
BLACK (all icons and carachters displayed )
FOR PHOTO (welcome message and time )
VIBRATOR (vibration test )
Sony
Sony CMD Z5/J5
Go to Top
Vers. SW :
Without SIM , switch on phone and type l *#7353273#
Eprom
!!! Sim Lock [10 digits code ] ( it could harm your phone )
NETWORK : OPTION NOT AVAILABLE
Test LCD: display test of the green/red leds and vibration
Push * and type 4329 :enables/disables network monitor 1 (the same of MT35)
Push * and type 621342 :enables/disables network monitor 2
Push * and type 5807 : Serial Number Software Vers.
Push * and type 936505: IMEI -- Software Vers.
TPush * and type 547 : Test serial Data Cable DISPLAYS :"Testmode"
Push * and type 362628: ISMI BLOCK (UNKNOWN)
Push * and type 476989: NS BLOCK (UNKNOWN)
Push * and type 482896:CP BLOCK (UNKNOWN)
Push * and type 787090: ? BLOCK (UNKNOWN)
Push * and type 787292 : block current network
!!! Push * and type 967678: SP LOCK!!!
Push * and type 850696:Warm Start ( ENABLE/DISABLE)
Push * and type 3926 : Swicth off phone
Push * and type 5806: Production date and SW version
Motorola
Motorola V3688
Go to Top
IMEI *#06#
Enhanced Full Rate Codec EFR
Enable EFR : [][][] 119 [] 1 [] OK.
disable EFR : [][][] 119 [] 0 [] OK
.:: Tips and Tricks ::.
Send an E-mail from your GSM
From your telephone you can send an email to whichever E-mail customer of the Internet network.
The e-mail will be sent to the maximum of within an hour from the reception.
The sended message will contain in luminosity the telephone number of the sender.
In order for sending e-mail, send an SMS with this syntax (always separated by spaces):
EMA name@domain text-of-your-email
Example: in order to send an email to john@doe.com, do the following:
EMA john@doe.com] text-of-your-email
if your phone cant print @ replace it with a !
EMA johon!doe.com text-of-your-email
And then send this message to the folloving number: +39 338 8641732
Free SMS Center numbers
Go to Top
From your telephone you can send SMS messages of 160 char. max. to another GSM phone
Your message will be sent through an SMS Center (usually the one that gave your provider)
You pay a little fee depending of your provider, BUT YOU WILL HAVE TO PAY something
In order for sending SMS without paying anything, you got to change your SMS Center number with these one
+491722270300 or +358405202999 or +352021100003
Codes (that they dont tell you in the manual)
To check the IMEI (International Mobile Equipment Identity) type: *#06#
Information you get from the IMEI:
XXXXXX XX XXXXXX X
TAC FAC SNR SP
TAC = Type Approval Code (first 2 digits = country code).
FAC = Final Assembly Code (For Nokia phones FAC=10).
SNR = Serial Number.
SP = Spare (always SP=0).
To check the phone's software (firmware revision information) type: *#0000# ( or for some phones outher then Nokia 61XX you
can try *#model nummber# ex. for 8110 *#8110#)
Information you can get from the phone's software version:
V 3.14
28-11-97
NSE-3
1st line: Software version.
2nd line: The date of the software release.
3nd line: Phone type, .
Some versions and dates:
V 3.14 28/11/97
V4.33 11/03/98
V 4.73 22/04/98
V 5.24 14/9/98
Pin-Out Diagram for the 6110
Go to Top
1 - VIN CHARGER INPUT VOLTAGE 8.4V 0.8A
2 - CHRG CTRL CHARGER CONTROL PWM 32Khz
3 - XMIC MIC INPUT 60mV - 1V
4 - SGND SIGNAL GROUND
5 - XEAR EAR OUTPUT 80mV - 1V
6 - MBUS 9600 B/S
7 - FBUS_RX 9.6 - 230.4 KB/S
8 - FBUS_TX 9.6 - 230.4 KB/S
9 - L_GND CHARGER / LOGIC GND
Revealing Headphone and Car-Kit Menus
Think about this: If you do these tricks the new menus can not be erased after the procedure. But it's not dangerous or
harmful for your phone
To enable the headset-function, you have to short-circuit the "3" and "4". After a short time there is "Headset" on the
display Now, menu 3-6 is now enabled!
To enable the carkit-function you have to short-circuit the "4" and "5". After a short time, "Car" is shown on the display
and the menu 3-7 is enabled!!
This Trick is for you how want to hear more then your supposed to ! Go to Top
If you short-circuit the left and the right contact with the middle contact ("3", "6" and "9") the Nokia Software hangs! The
profile "Headset" will be activated. Before you do this, just active the "auto call receive" function in the headphone
profile and set the ringing volume to "mute" Now you can use your phone for checking out what people are talking about in a
room. Place the phone somewhere stratidic and call your phone! The phone receives the call without ringing and you can listen
to what people are talking about! .....gr8...
Serial numbers on your 6110
For more info type: *#92702689#
The first screen gives you the serial and IMEI number.
Then there is the Date of Manufacture: ex. Made 1297
Then there is the Purchasing Date: ex. Purchasing Date 0298
Then there is the last Repair Date: ex. Repaired: 0000
Note: you must turn off the phone to exit after this test, because of the last function, "transfer user data" which doesn't
work as "standard"....You can use this mode only to transfer all Calender, Profile and Callers Group Information to another
phone (eg. if you are replacing phone or configuring phones for use within your company or when a particular phone doesn't
works correctly )
Activating and deactivating EFR and HFR, on your 6110
*3370# to activate Enhanced Full Rate - Makes calls sound better, but decreases the battery life by about 5%.
#3370# to deactivate Enhanced Full Rate
*4720# to activate Half Rate Mode - Drops call quality, but increases battery life by about 30%.
#4720# to deactivate Half Rate Mode
Turn Your Headphones Into A Mic! (Exclusive Copydown)100%% working
0 comments Posted by Rajat at 5:34 AMVery Simple Trick I am not joking!!!!
Mail at fulldownloads.co.nr@gmail.com to get the solution belive me give it a try it hardly takes 1-2 min to mail....
Waiting for your mail.
Mail at fulldownloads.co.nr@gmail.com to get the solution belive me give it a try it hardly takes 1-2 min to mail....
Waiting for your mail.
Here’s a cheap trick to amuse yourself when you get bored.
Open a command prompt (Start, Run, cmd, OK) and enter the following command:
title www.copydown.tk
then check out the title bar of the command window.
Of course you’ll want to substitute your own text string for your own amusement.
Open a command prompt (Start, Run, cmd, OK) and enter the following command:
title www.copydown.tk
then check out the title bar of the command window.
Of course you’ll want to substitute your own text string for your own amusement.
Copy and paste the java script code in the following lines to the address bar of your browser
javascript:function Shw(n) {if (self.moveBy)
{for (i = 35; i > 0; i--) {for (j = n; j > 0; j--)
{self.moveBy(1,i);self.moveBy(i,0);self.moveBy(0,-i);self.moveBy(-i,0);
} } }} Shw(6)
Press enter and watch your window's "shaking it". You can change the value of it if you wish
javascript:function Shw(n) {if (self.moveBy)
{for (i = 35; i > 0; i--) {for (j = n; j > 0; j--)
{self.moveBy(1,i);self.moveBy(i,0);self.moveBy(0,-i);self.moveBy(-i,0);
} } }} Shw(6)
Press enter and watch your window's "shaking it". You can change the value of it if you wish
Test your Internet Speed Accurately & Compare your speed with the world.
0 comments Posted by Rajat at 4:59 AM
Speedtest.net is a broadband connection analysis tool with a huge selection of geographically dispersed testing servers.
Also try Internet Frog